
Let's start learning how to work in Jupyter
Python is
- general-purpose programming language conceived in 1989 by Dutch programmer Guido van Rossum.
- free and open source
- has simple syntax
- object oriented: EVERYTHING IS AN OBJECT
- popular among the largest tech firms in the world: Google, Amazon, Uber, Dropbox, Reddit, Youtube, ...
- popular in the scientific community: academia, NASA, CERN, Wall Street, ...
Jupyter (Notebook) aka IPython
- is one way to write and execute Python code
- is browser based
- results in files that are easy to share and rerun (and thus easy to collaborate with)
- allows users to mix code and formatted text and mathematical expressions (and thus produces elegant and easy-to-digest reports)
- is great for new coders
In fact, almost every page on this website is a Jupyter Notebook! Notice how there are headers, full text formatting, media inserts, and also code snippets and output. This means readers see output immediately after the relevant code, and makes understanding code much easier.
Outline
In the next week, we are going to get a “functional” start on Python, i.e. get just enough practice on essential actions so that we can cover later lessons. Only practice and time can make you comfortable and fast with Python. You’ll get much more practice just going through classes as this semester proceeds, so when you are frustrated, or stuck, just remember to keep going! And consult the resources and help sections on this page and on the homepage.
- Starting our first Python file in Jupyter
- Jupyter: working with cells and inside cells
- THE MOST IMPORTANT PART OF THIS PAGE
- A simple program
- Working with files
- Tidying up
BUT FIRST! HAVE YOU...
- FILLED OUT THIS SURVEY?
- Gone to the Discussion repo and clicked
Watchon the upper-right corner (in order to see class announcements? - Added about 5 useful URLs, as listed in the last lecture?
Opening Jupyter and Basic Usage
Did you download and install Anaconda? If yes, we can proceed. If not, go back to the lecture files and follow the instructions so that you can follow along. (And if you haven't, then you aren't doing the after class work!)
So, let's write our first file!
Opening Jupyter, and choosing your "working directory"
Your options:
- Windows: Open Anaconda Powershell Prompt and type
jupyter notebook - Mac: Open Terminal and type
jupyter notebook - Either: Open Anaconda Navigator (which opens a menu of programs) and then select Jupyter
Practice: Try one of these! All of these open a new tab on your browser:
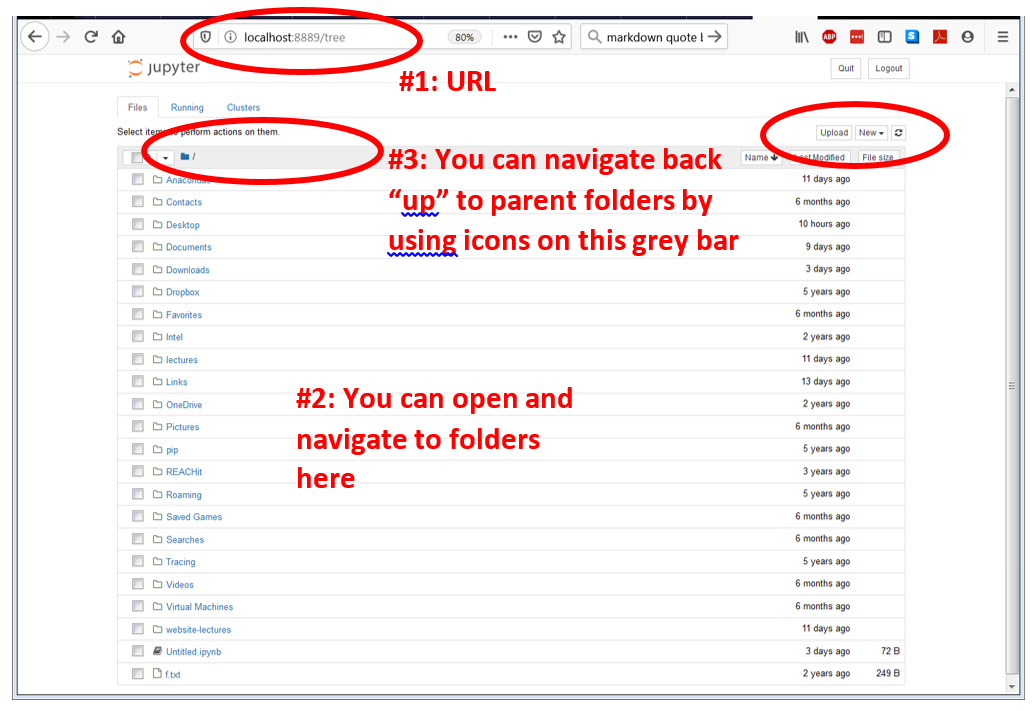
How I open Jupyter Notebook:
Navigating from the default location Jupyter where opens to a folder/director where a python file actually is, or where you want it to be, can be annoying. So what I usually do to open Jupyter is:
- Navigate on your computer to the folder you want to work in/where the Py file is. Often, you'll create a new folder specific to the project. Let's call today's project "FirstPythonCode" and create a folder for it. You can put it wherever you want.
- Find the full path to the folder, e.g.
C:\Users\Don\FirstPythonCode- To get the path name in Mac: right click the folder, hold down the option key, and then click "Copy as path name"
- In Terminal or Powershell type
jupyter notebook --notebook-dir "C:\Users\Don\FirstPythonCode"- Here the
--notebook-dirmeans that we are opening Jupyter but want to choose the notebook location, and then we type the location. - I have this command (
jupyter notebook --notebook-dir) pasted into a note on my computer so I can quickly copy and paste it into the shell.
- Here the
Suggestion: After class, open navigating_github.md and add a section for "Jupyter Quickstart", and put bullet points under it with, for example, "Opening Participation Repo: jupyter notebook --notebook-dir <path>". If you put the code part inside of backticks (the symbol under the tilde on your keyboard), GitHub will make it look like code!
Practice:
- Create a folder on your computer called "FirstPythonCode" Wherever you want should be fine.
- Open Jupyter Notebook so that you can see files in that location. You can either navigate within the browser by point-and-click navigation (methods 1-3 above), or use my technique to open Jupyter directly to the location.
- Click on "New" and "Python 3" to create a new notebook.
- Stop here so we can discuss what you're seeing.
We are going to do a lot of livecoding together in class. Save these files as they are at the end of class, because they are an important chunk of your participation grade. Shall we talk about participation quickly?
A sample notebook will look like this:
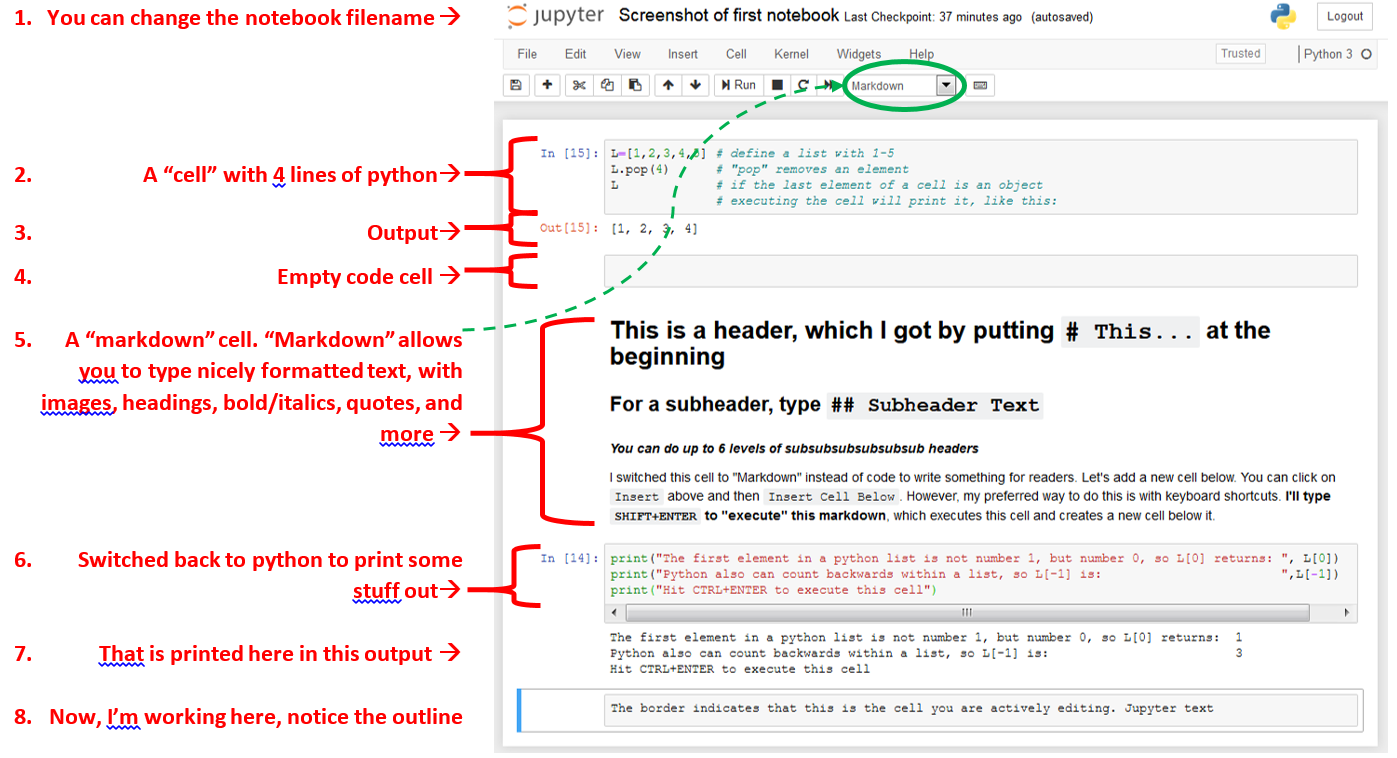
Leaving comments in the code is important! While good, smart code tries to reduce the use of comments by writing code so obvious that it is "self-documenting" (I'll explain why later), for now... you should err on the side of adding MORE comments. Why? If you need to take a break and come back at a later point, comments will help to quickly bring you up to speed if you forgot why you put in a particular line of code. Getting in the habit of using comments is smart.
You'll become more discerning about comments as you progress. Two articles about how and when to use comments: this link and this link
- Save that file: Give it a name at the top: "In Class-Lecture 2". Now look in the folder on your computer - it should be there! CHECK-IN: Do you see it? Note that under the "File" menu you can
- Make a copy
- "Save As" (give it a new name/location, and the existing file will remain where it it)
- "Save and checkpoint". You can "roll back" to this checkpoint later. Useful while exploring!
- Let's type some Python in the notebook
- Copy the first 3 lines in example above. Do you notice the syntax coloring?
- The hashtags/pound signs are the "comment signal". They tell Python to ignore everything to the right of it on that line, so that you can write notes to anyone looking at the code.
- Run that code:
CTRL+ENTERwill run the code in the active cell- "Kernel" menu > "Restart and Clear Output" will clear the workspace (so Python will forget all variables and objects in memory for this session) and then "Cell" menu > "Run All" will rerun everything. YOU MUST DO THIS ON EVERY FILE WHEN YOU ARE DONE TO ENSURE THAT THE CODE WORKS IN ORDER AND CAN BE REPRODUCED BY OTHERS!
- Add a new cell below by clicking "Insert" > "Insert Cell Below".
- Add a new cell below by keyboard shortcut. To do that, we need a quick digression on Jupyter's modal editing system. Check out the popout to the right.
Jupyter notebook uses a modal editing system.
This means that the effect of typing at the keyboard depends on which mode you are in. The two modes are
- When you are typing inside a cell, you are in Edit mode, and there is a green border around that cell. Switch into edit mode by hitting
Enteror double clicking in the cell. - Command mode means that keystrokes are interpreted by Jupyter as commands (e.g. insert a new cell). When you are in command mode, the green border is replaced by a grey/blue border. Hit
ESCto switch to command mode.
The modal behavior of the Jupyter notebook is a little tricky at first but very efficient when you get used to it.
.
.
.
.
.
.
.
.
.
.
.
.
So switch to command mode (hit ESC) and insert the new cell below by typing b.
- Switch the inserted cell to markdown (via the markdown/code drop down box) and write several lines.
- Split the markdown cell in half and insert a cell in the middle of those halves.
How do you split a cell in half?Better question: Where do you look for an answer about how to do that?- This is a good time to explore! Take the "user interface tour" under help, then look through the various menus, check out the Keyboard Shortcuts (under the help menu), and then search through the "command palette" (which looks like a keyboard icon at the right side of the Notebook Toolbar). The command palette is very useful because you can search for commands! Return to the shortcut menu and command palette often!!!
- Switch that middle cell to "code" mode via keyboard shortcuts.
- Add a cell at the bottom of the notebook, and then delete it:
ESCto go to command mode and thenD,D(hit the "d" button twice).
Class poll? How did we do? 9/9?
If so, we're in great shape! Obviously, we will learn much more going forward, but you have enough to play around with Jupyter now. I highly recommend doing some introductory Python tutorials over the weekend. The bottom of this page lists some great places to start.
Resources, help, and documentation
The help and documentation section of the "Python Data Science Handbook" by Jake VanderPlas begins by saying:
If you read no other section in this chapter, read this one: I find the tools discussed here to be the most transformative contributions of IPython to my daily workflow.
When a technologically-minded person is asked to help a friend, family member, or colleague with a computer problem, most of the time it's less a matter of knowing the answer as much as knowing how to quickly find an unknown answer. In data science it's the same: searchable web resources such as online documentation, mailing-list threads, and StackOverflow answers contain a wealth of information, even (especially?) if it is a topic you've found yourself searching before.
Being an effective practitioner of data scienceBeing efficient in many aspects of life these days is less about memorizing the tool or command you should use for every possible situation, and more about learning to effectively find the information you don't know, whether through a web search engine or another means.One of the most useful functions of IPython/Jupyter is to shorten the gap between the user and the type of documentation and search that will help them do their work effectively. While web searches still play a role in answering complicated questions, an amazing amount of information can be found through IPython alone.
The official IPython documentation has the same gist. So let's call the "Five most helpful commands in IPython:
| command | description | Example |
|---|---|---|
| ? | Python documentation | len? |
| %quickref | Quick reference. | . |
| help( |
Python’s own help system. | help(len) |
| object? | Details about ‘object’, use ‘object??’ for extra details | my_list? |
| < TAB > | Auto-completion menus (REALLY HELPFUL!) | import < TAB > |
Python Data Science Handbook elaborates nicely on ? and tab completion.
If we have time, click that last link and check out tab completion. If not, everyone should do this after class. I find tab-completion absolutely essential, and think you'll be happy to know it!
A simple program: importing data and packages
The following program could be written as a basic .py file like it is here. To save results from it, we'd have to output pdfs of figures, text files for tables, or just save the entire run with an ugly log file like this (I saved this to an HTML file.)
Yuck! There must be a better way!


And the Sistine Chapel of hysteric infomercial fails
.
.
.
.
.
.
.
.
.
.
.

Put that in the Guggenheim.
Now, let's take a quick look at a simple program and then come right back here. If you want to download the raw unrendered ipynb file here, you can load this into a Jupyter session and manipulate it.
Installing libraries
The Anaconda distribution we installed also installed most of the key data science Python libraries/packages we will use throughout the semester. In the event you need to install a new package to add functionality to Python, e.g. matplotlib (which you already have!), you can
- Open Anaconda Powershell (Windows) or Terminal (Mac) or Jupyter (yes!)
pip install matplotlibwill install the package matplotlib.
Some packages can't be pip installed, but hopefully you won't need to deal with that this semester, so I'm going to skip discussion of such package installs.
Working with files
Jupyter files have a .ipynb file extension. The standard Python file extension is .py and you will sometimes want to run code from a py file. You can either:
- Open the .py file itself and execute it directly in Jupyter
- Open the .py file in Jupyter or a text editor, and then copy and paste the code into a Jupyter cell (reminder: make sure it's a "code" cell, not a "Markdown" cell!)
- Run it in Jupyter with a magic command. (More on magic commands here.)
%run test.pywill run the filetest.pyif the file is in your working directory. - Load it in Jupyter with a magic command:
%load test.pywill copy and paste the whole file into you open notebook.
Suppose that test.py (here it is within the lectures repo) contains the following, which I've copied into a notebook cell (Method 2):
for i in range(5):
    print('foobar')
Or I could execute that without copy and pasting by running (Method 3):
%run test.py
Or I could load the contents via a magic command (Method 4). Below, I typed %load test.py, then executed the cell with CTRL+ENTER, and Jupyter did the rest (including adding the # comment sign:
# %load test.py
for i in range(5):
    print('foobar')
The most useful magic commands
Again, a nice introduction to magics is here.
%pwd- what is the working directory at this stage of the code?%ls- what is in the working directory%timeitand%%timeit- times the code.%times a single line of code, and%%times the entire cell%conda- runs the "conda" package manager within IPython (Conda installs, runs and updates packages)%debug- starts the debugging interface%load- loads a python file%%filewill save the cell (and just that cell) to a python file- You can ask IPython for help on magics! E.g.
%timeit? - IPython can list all magics
%lsmagicand describe them all%magic(although just going to the official documentation is probably better)
The file isn't in my (current) working directory!
For example, if your code is in \Documents\ and you try to load test.doc and it's in the same folder, all is well. But if test.doc is inside your English Class's folder (\Documents\ENG101\), then the code can't see the file and will produce an error.
The working directory is where your python code "thinks it is". You can type pwd to find out the working directory.
If a file you need isn't in the PWD, you have a few options:
- Move the file into the PWD:
- Copy/paste between folders on your computer
- If you haven't changed the PWD, then it's wherever your code is (typically). Use the "Upload button" in IPython's dashboard to upload the file to that location (the page that opened up when you started IPython).
- Change the PWD to where the file is: Use the
cd "<path to folder>"command. (Hint: You can use tab completion to type the path out faster!) Type the full path to the file. Just kidding, try to NEVER do that!C:\Documents\ENG101\test.doc
Ending class
Save your live coding file, then upload it to the participation repo
CTRL+Sorapple+Swill save the notebook.- Find the file on your computer. Then open your participation repo on GitHub. Make sure you're logged in.
- Then you can drag the file onto the repo. Add a comment then click "commit changes", and voila!
Reminder: Drop-in hours
Before next class
- After class: Upload the notebook you've been playing with into your participation repo.
- Windows users: Writing commands into Powershell can be slow. Would you like to be able to copy and paste? Doesn't that sound faster? Then activate it! So
- Right click on the title bar of the Anaconda Powershell Prompt
- Select Defaults
- Under "Edit Options", select all the boxes.
- Verify it works by copying some text in the prompt (highlight any text in the shell, and hit
ENTERto copy) and pasting it (right clickanywhere inside the shell). - Close the shell, reopen it, and do the copy/paste test again. If it works, we're set!
- Python intro tutorials. Go to the Resources tab of this website.
- Look at some of the cheatsheets I provided there.
- Walk through a tutorial. You can do some of Whirlwind of Python or instead some of Datacamp. Just play around a little! (The official python documentation tutorial is pretty good too, as is Dive into python
- Sections 1, 5, and 8 of this page describes some elemental Python things
Credits
This lecture borrowed from the first chapter of the Python Data Science Handbook and QuantEcon.