
Motivation, or: Should I take this class (A: YES!)
Employers are starving for talented students that can use Python, and they are willing to pay for it:
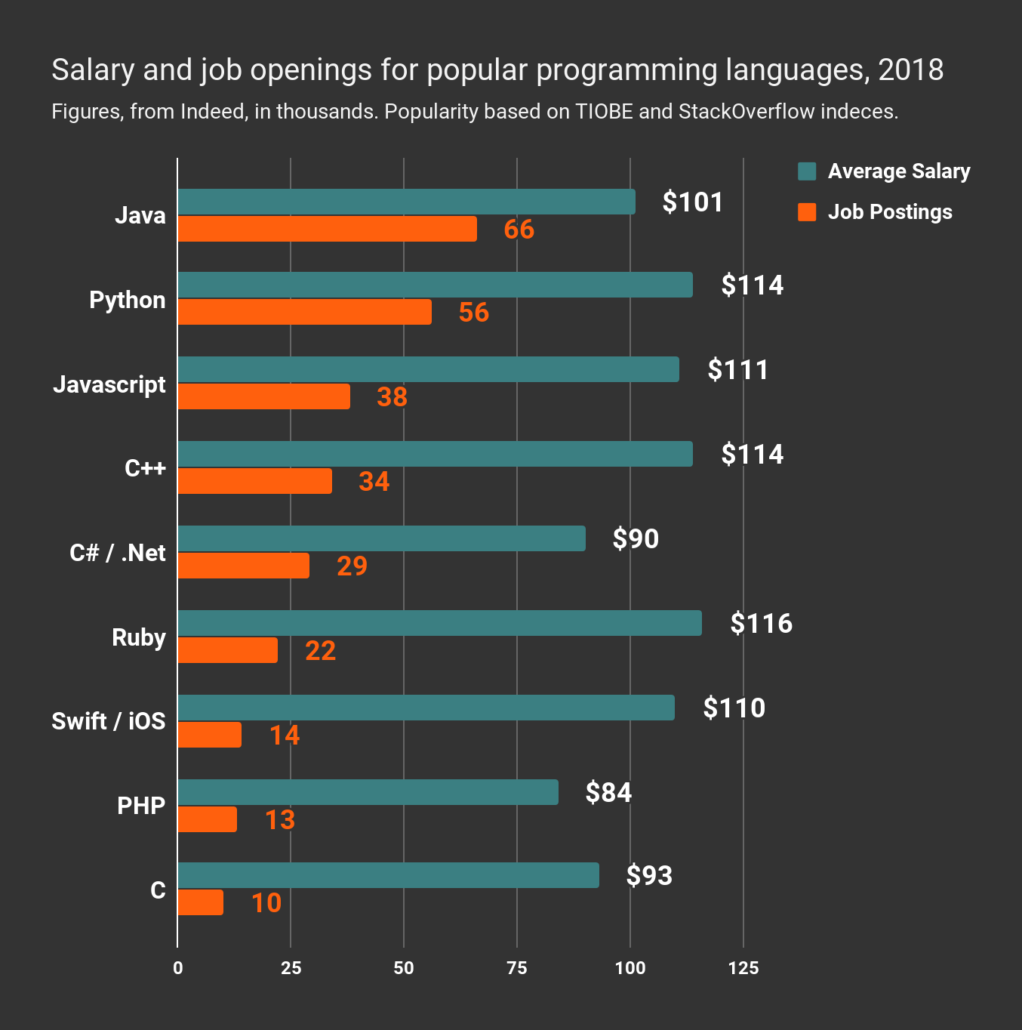


Have you heard any employers or guest speakers talk about the role of programming languages in the recent finance job market?
And it's not just "I can make Python print 'Hello World'".
The data scientist approach
- Define a problem/project in a valuable way: A clearly specified question with metrics for success and idea of impact. Always keep the big picture in mind!
- Valuable skill even if you never code again!
*Coworkers can be unreliable:


- Work collaboratively on the problem.
- Interesting problems are big and rarely solo: Sir Edmund Hilary needed Tsenging Norgue to climb Everest.
- Valuable skill even if you never code again! Understanding how to manage how any team projects evolve (whether it is producing a document, or slides, or whatnot) is extremely valuable. Imagine spending a week on a report, and then your boss Jan or your coworker Jean Ralphio* undoes your week of work by editing a version of the report that is a week old. ARRRRRG!
- Acquire data and clean it. Age old wisdom tells us that if the input is crap, the output will be... Time spent on cleaning is often more valuable than time spent on modeling.
- Explore the data.
- Analysis using appropriate modeling tools. This is <25% of the work on most projects.
- Deliver the project conclusions to higher ups in the form of clear business recommendations. Writing should always be geared to the audience, and managers typically want bottom lines, whereas technical leads need more technical justification.
- Valuable skill even if you never code again!
From here to there...
I've designed this class with the hope that you'll be prepared and able to execute each of those steps.
By the end of the semester, your resume, should you choose to, can include your (burgeoning) proficiency with Python, Github, Machine Learning (ML) tools, web scraping, and data viz, in addition to describing your exploits on Github and the final course project.
So, in terms of data scientists, your journey this semester is hopefully something like:
I guess that makes me your old assistant on the journey...

Our bargain (not Faustian, I hope)
This class is ambitious! You will need to learn skills from computer science, statistics, and econometrics just so that we have the toolkit needed to begin analysis. I'm aiming to make each of those components accessible (e.g. we won't prove any theorems, and I'm boiling down programming to essentials). Still, that menu of skills is not easy to acquire (that's why employers pay \$\$\$ for it!), and...
THUS: You will have to work outside of class quite a bit.
And if you've never programmed:

- I swear, youngens these days have it so much easier!
- Seriously, getting Python up and running has never been quicker, and we will have some working code soon!
- You will be frustrated at times. This is natural! No programmer exists who has not cursed their computer to the depths of hell.
- This is completely true: Half the time, it's a silly typo on line 42 of your code. Like, you literally misspelled "regression" as "regresion".
- Corollary: A lot of programming takes place after dark, under the influence of coffee and Red Bull. This is why you misspelled "regresion". Try to program at times when you have a clearer mind :)
- Overcoming those frustrating issues feels soooooo good. You'll feel a sense of accomplishment. Fight for that!
- Your classmates are in it too, and they can, and surely will, help.
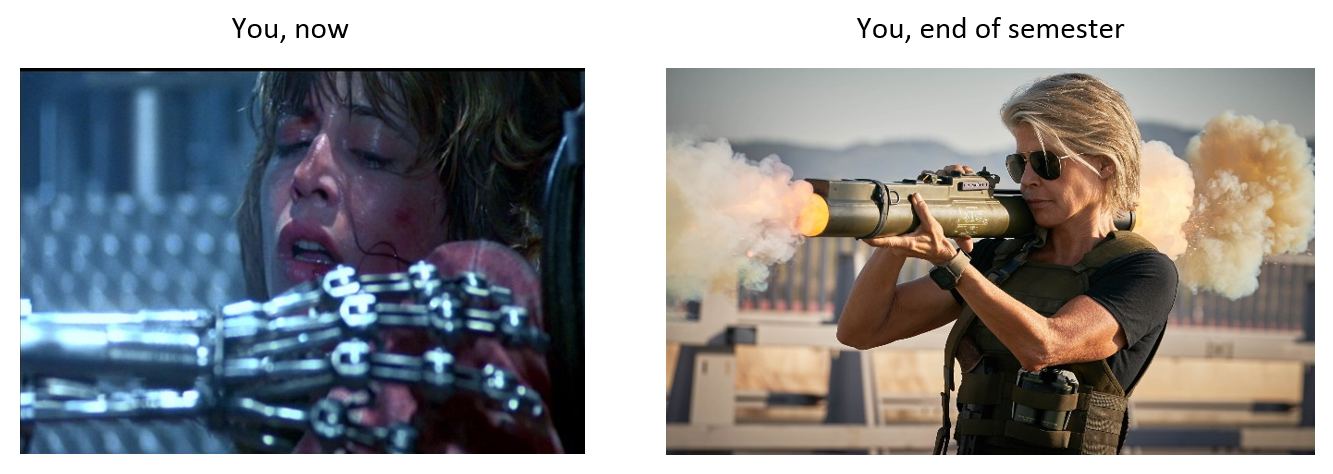
My half of the bargain: I will work just as hard as you throughout the semester to improve this new class. It's experimental so some things (lectures, assignments) will succeed and aid you along that journey towards being Terminator 3 Linda Hamilton, and some things I try will fail. When something doesn't work out, I'll try to improve it.
Related: When you have questions in class, ask! Falling behind is costly, and asking a question is cheap. If you're confused or having computer issues, someone else surely is too. If you're stuck outside of class (homeworks, assignments, etc.), see the resources section of the website for a set of things you can do. After trying the options there, you can always... (come to the drop-in hours!)
Tour the course site
Go over the following:
office hoursdrop-in hours to ask questions- major topics and themes
- syllabus
- you should check out the schedule frequently!
- I'll skip for now, but you should check out the assignments, participation, and resources tab. Please bookmark the main page and visit these often! The class is still in development, so things will change frequently.
Getting started - Our programming stack
Click on these links to get the downloads going. Then, we will go on to the next section while these continue in the background.
Download Anaconda (not the Nicki Minaj song). Install the latest version, make Anaconda your default Python installation, and accept all the defaults otherwise.
Download Git.
Download a Git client: To make our lives simpler, I recommend GitHub Desktop. I accepted the default settings.
"Fun" fact: It is annoying that the names are so similar, but Git $\neq$ GitHub $\neq$ GitHub Desktop! This will make more sense soon, I promise!
Github
Note: I use Windows and will be of less help for Mac users. The TA, however, uses Mac and will be more helpful when issues stem from OS differences. GitHub, in particular, might be finicky if you have outdated versions of Safari or any other browser.
We will be using GitHub a lot in this course:
- All of your course-related work will go on GitHub.
- Discussion / help / announcements will happen on GitHub. (Yes, announcements!)
- This entire website is on GitHub!
- Assignments are posted on GitHub.
But why GitHub? Because it's tremendously effective for developing a project. It is used by Apple, Uber, Netflix, Google, Microsoft, Bitcoin, CERN, Chinese censors (wait, what?), and many more large, sophisticated, multi-billion dollar entities.
It's useful for (1) cloud storage, (2) collaboration, and (3) version control.
Let's get started!
Register a GitHub account
Your turn: Register for a free account on github.com. Give your username some thought. (Ideally, it should include your name.)
GitHub as cloud storage (4 min)
At the very least, GitHub allows for cloud storage, like Google Drive and Dropbox do. There's a bit more structure than just storing files under your account:
- Repositories (aka "repo"): All files must be organized into repositories. Think of these as self-contained projects. These can either be public or private.
- User Accounts vs. Organization Accounts (aka "Org"): All repositories belong to an account:
- A user account is the account you just made, and typically holds repositories related to your own work.
- An Organization account can be owned by multiple people, and typically holds repositories relevant to a group (like STAT 545).
Examples:
- The
LeDataSciFi.github.iorepo, within its correspondingLeDataSciFiOrg. - The
awesome-pythonrepo is a "curated list of awesome Python frameworks, libraries, software and resources"
GitHub as cloud storage - Activity (10 min)
Together: Make a participation repo
- Follow the setup instructions on the participation page.
Navigating GitHub
- Together: Make a new file on your participation repository:
- Click on the "Create New File" button on your repository's home page.
- Call it
navigating_github.md - Leave it blank, and commit ("save") the file by clicking on green "commit new file" button at the bottom of the page.
- Together: Add the following URL's to your
navigating_github.mdfile (click on the pen button to edit), as a bullet point list of useful URLs:- The class homepage
- The lecture homepage
- The Discussions and Announcements repo
- The LeDataSciFi github organization homepage (https://github.com/LeDataSciFi)
- Together: Commit the changes.
- Your turn: Continue the exercise, and add more URL's (with more commentary):
- Your participation repo
- Your user account page
- Your turn: Commit the changes.
GitHub for collaboration (4 min)
The "traditional" way to collaborate involves sending files over email. But emails get buried, and, also... who has the most recent version, and what is it?

Git(Hub) solves this!
Git (just "Git") is a distributed version control system. Basically: "Imagine if Dropbox and the "Track changes" feature in MS Word had a baby. Git would be that baby." It's great for us because it's optimized for code.
GitHub (not just "Git") is built on top of the Git system. Among the many added features that make collaboration easier, two are worth highlighting:
- The GitHub repository is treated as the "master version".
- You can (and probably should!) use GitHub Issues instead of email to track open tasks.
- Issues are a discussion board corresponding to a particular repository.
- One "thread" is called an Issue. Some features:
- You can tag other GitHub users using
@username. - Get email notifications if you are tagged, or are
Watching a repository.
As an example, check out the Issues in the ggplot2 repository.
We will talk about collaboration later. Suffice it to say, managing group tasks is of paramount importance in virtually all jobs you might have after college.
GitHub for collaboration - Activity (1 min)
Together: Watching the Discussions repo. THIS IS WHERE CLASS ANNOUNCEMENTS WILL BE POSTED.
- Navigate to the LeDataSciFi Discussions repository.
- Click
Watchon the upper-right corner of the repo
You should now get an email notification whenever an Issue is posted by myself, the TA, or if your classmates ask a question.
GitHub for version control with Git (5 min)
This is so important, I'm elevating this to a section header:
*** THE WORKFLOW RECIPE ***
To start any project:
- Create a participation repo on GitHub (you can create a new one, fork or clone an existing one, or for assignments - be invited to one). If it's brand new, make sure to initialize the repo with a README. There is a gif here showing me opening a new repo.
- Clone the repo to your local machine using GitHub desktop.

Now, every time you want to work on the project:
- Pull the existing master repo into your local repo on your computer (just in case a change was made by others). GitHub Desktop calls this operation a "fetch" and Git calls this a "pull".
- Work on the project in the local repo (on your computer).
- "Stage" the files to tell Git about those changes. GitHub Desktop automatically sees changes to files in the local repo when you save them and automatically “stages” them, by listing them as “changed” files in the left part of the screen. (Nice!)
- "Commit" to the changes to tell Git, "yes, I want to do this, and what I did was [describe the changes]". In GitHub Desktop, this means adding a short summary and (optionally) a longer description. Then click the "Commit to master" buttom. Do this early and often!!!
- You’re almost ready to push the changes to cloud, but not yet! What if someone else (or you on a different machine) made changes to the master repo? Prevent issues by doing this step: "fetch"/"pull" from the master repo. (On GitHub Desktop for Windows, you click the "repository" menu and then "Pull".) If there are any conflicts, you’ll be notified and prompted to fix them. If there are conflicts, fix them!
- You "push" the committed local changes to the master GitHub repo by clicking the "Push origin" button! Do this early and often!!!
Even though steps 1 and 5 might seem pointless during solo projects, I encourage you to practice these good habits now, so that when you do collaborative work, you're protected from mistakes.
Again, commit and push often! It's almost as important as hitting CTRL+S while working on a document.

My turn: Demonstrate some of the Git version control elements on GitHub
- Fact: Git only pushes/tracks the changes (called a diff) associated with a commit, so that it doesn't need to take a snapshot of all your files each time.
- View commit history of the LeDataSciFi.github.io repository by clicking on the "commits" button on the repo home page.
- View a recent diff by clicking on the button with the SHA or hash code (something like
6c0a5f1).- This is also useful for collaborators to see exactly what you changed.
- View the repository from a while back with the
<>button. - View the history of a file by clicking on the file, then clicking "History".
Why version control? In addition to the awful "file naming conundrum" in the comic above,
- Don't fret removing stuff
- Leave a breadcrumb trail for troubleshooting
- "Undo" and navigate a previous state
- Helps you define your work
Asking effective questions online
Start with the resource page. If that link is dead: https://ledatascifi.github.io/studentresourcevert/resource-landing.html
Before next class
- Finish setting up our programming stack as described above - install Anaconda, Git, and GitHub Desktop.
- Update Anaconda: Open up Anaconda Powershell Prompt (on windows, or terminal on Mac) and type
conda update anaconda
- Update Anaconda: Open up Anaconda Powershell Prompt (on windows, or terminal on Mac) and type
- Test start the Jupyter Notebook (simply see if you can open it, then close it)
- Open Anaconda Powershell Prompt/terminal and type
jupyter notebookand an internet tab should open with the urlhttp://localhost:8888 - (You can also open a Jupyter by opening
Anaconda Navigatorand then clicking on Jupyter, but I recommend using the Powershell Prompt, because getting comfortable with that will be helpful)
- Open Anaconda Powershell Prompt/terminal and type
- Github
- Tell us what your username is by filling out this survey.
- Please add a profile photo on GitHub, to make our exchanges and community more personal (it's easier for classmates to ignore a "Twitter egg" than a smiling Mountain Hawk)
- Sign up for a student discount.
- Github practice: Set up confirmation / easy practice: create a participation repo following these directions. As a bonus, try to "clone" the class's lecture repo and click around and explore it to find the lectures.
- (Note: You might see the term "Forking a repo". "Forking" is different than "cloning" a repo. Cloning directly ties your local version to the original repo, while forking creates a copy on your GitHub (which you can then clone). Cloning makes it easier to fetch updates (and is often the best choice for new GitHub users), but forking has advantages too.)
- You probably will want to edit text files on your computers at some point. The built in text editors on Windows and Mac aren't very good. I use an old and crappy one that I won't recommend. I'll recommend Atom, which your TA uses, and Sublime.
Credits
- QuantEcon.org
- EC607
- The GitHub section, in particular, draws heavily (and replicates) on STAT545