

First things first
- The assignment was posted. If you haven't received an email, please let me or the TA know immediately by tagging us in a GitHub issue.
- Open a folder on your computer with your participation files, open Jupyter to that location, and create a new python file. Name it "Class 3 live coding".
- Going forward, have Jupyter opened to your participation repo before the start of every class. This is an interactive class, and will be all semester!
Reminders
You can't learn programmatic material in class, try though I might to make it possible. You can only learn through practice. You should be checking out tutorials and lessons online in your free time. My "best" suggestion would be:
- Absolute must do: Go through #3 to #14 of A Whirlwind Tour of Python. These are short (read-->fast) but clear and comprehensive and will introduce you to virtually all of the key components of coding we will do this semester.
- As you go through that, have one large python notebook open, and simultaneously write and execute code as the book discusses it.
- You will learn much faster by replicating and doing that than "reading, and hoping it sticks".
- This will become your personal "cheat sheet". Of course, there are more cheat sheets on the resources page.
- Prefer to learn through games? That's how I learned python! (I built solvers for Sudoku and the Cracker Barrel golf tee game... Both taught me a LOT about programming in python, problem solving strategies, and data structures.) Some simpler games:
- Edabit has a bunch of games. If you log in, you can search for python challenges that take from 1 minute to ... longer... For example, the Museum of Dull Things. If you find any games illuminating, please let me know via the class discussions repo!
# YOU: TYPE ALL OF THESE OUT ON YOUR OTHER PARTICIPATION SHEET... YOU CAN OMIT THE COMMENTS IF YOU WANT
# YOU: TRY VARIATIONS TOO...

print(2+3) # addition
print(2-3) # subtraction
print(2/3) # division - in Python 3, division of integers (a data type) inherently returns floats (a data type)
print(type(2), type(2/3)) # see?
print(2//3, type(2//3)) # floor division returns an integer.
# FOR YOU to try: use this to tell me how many full hours are in 7643 minutes?
print(2%3) # mod operator
print(2*3) # multiplication
print(2**3) # 2 to the power of three
print(2^3) # ^ is NOT the power operator!!! it is a 'bit' operator - you don't need to know this for now

int(2+3*(4+15)/3) # 1. PEMDAS applies
                  # 2. If the last command in a cell return an *object*, jupyter auto prints it w/o needing print()
                  # 3. this should be a float (21.0), but you can convert a float to an int with the int() function
Parentheses - Grouping and Calling
As the above example shows, parentheses are for grouping ((4+15)/3 forces addition before division) and calling a function (e.g. print() means the print function is called on the inputs inside the parentheses).
Logic and comparisons
The comparison operators are == (equals), != (Not equal), > (greater than), >= (equal or greater than), <, and <=. Each of these prompts Python to evaluate the truth of the comparison and return True or False.
True and False are booleans, meaning True is equal to 1, and False is equal to 0.
# YOU: TYPE ALL OF THESE OUT ON YOUR OTHER PARTICIPATION SHEET... YOU CAN OMIT THE COMMENTS IF YOU WANT
# YOU: TRY VARIATIONS TOO...

print(3>3)            # 3 is not greater than 3, so this evaluates to...
                      # YOU: try 2 of the 3 other comparison operators
print(True == 1)
print(type(True), int(True), type(False), int(False)) # print() can print a sequence of objects
The logic operators are and, or, and not. They evaluate a sequence of statements and return a true or false boolean.
What does or mean? In common parlance, or usually means "Do you want A or do you want B? (pick one)". Mathematically, or works like a dad joke - You: "Dad, are we rich or poor?" Dad: "Yes".
# YOU: TYPE ALL OF THESE OUT ON YOUR OTHER PARTICIPATION SHEET... YOU CAN OMIT THE COMMENTS IF YOU WANT

a = True              # you assign variables by writing: VariableName = Thing.
b = False
print(a and b)        # if both sides of *and* are true, the whole thing is
print(a or b)         # if either side of *or* is true, the whole thing is
print(a and not b)    # *not* negates what is after it
print(not a or not b) # "not b" is true, so the whole thing is true
The membership operators in and not in check whether the left object is or is not in the object on the right side.
# try these... what do you get?
a=3
b=[1,2,3]
print(a in b)
print(a not in b)
print(b in a)
print(b not in a)
The identity operators is and is not check whether the left side and the right side are the same object.
WARNING: is and == are NOT the same!!!* Here is an example borrowed from G4G.
list1 = []
list2 = []
list3=list1
print(list1 == list2)
print(list1 is list2)
print(list1 is list3)
Parentheses: You can (and certainly will at some point need to) check for the truth of statements involving many variables, and complex logic requests. You can dictate the order Python evaluates statements. So, for example,
if (Poor and TaxRateAtOrBelowNegative10) or (MiddleClass and TaxRateAtOrBelow5) or (Rich and TaxRateBelow15):
    start_audit()
will audit rich filers if they have less than a 15% tax rate, but will only audit poor tax filers if they had a negative tax rate.
# a few silly examples

print((3>3) == False) # 1 is not greater than 2, so this evaluates to...
print(3>3 == False)
print((3>3) != True)
x = [1, 2, 3]
print(type(x))
y = x
print(y)
x.append(4)
print(y) # y was changed as well... Why? Read the page above!
Everything is an object
Referring again to Whirlwind of Python,
In object-oriented programming languages like Python, an object is an entity that contains data along with associated metadata and/or functionality. In Python everything is an object, which means every entity has some metadata (called attributes) and associated functionality (called methods). These attributes and methods are accessed via the dot syntax.
So, object.method(<arguments here>) will call the function method from/on object, and the function uses whatever arguments you pass it.
Examples:
- Above, the object
xhas the type attribute oflist, and lists have a "method" calledappend. - In the simple program, we imported a package:
import seaborn as sns. Now, the "package"seabornis actually an "object" (which we callsnsfor convenience). That object - like any object - has "method" functions. In that code, for example, I calledsns.lineplot(data=cumrets)to plot a line. - _Note: I actually called
sns.lineplot(data=cumrets).set_title("Returns, ex-dividends"). In this, python evaluatedsns.lineplot(data=cumrets), which is itself an object (the plot), which in turn has additional methods. So I was able to "chain" that with.set_title("Returns, ex-dividends")to add the title._ - Seriously, EVERYTHING is an object.
- Lists are objects (duh)
- Attributes and methods of objects are themselves objects. Put
type(x.append)at the end of the code block above. - Files
Common object types
Boolean and int were covered above.
None. See here.
float. WARNING: Beware of comparing floating point numbers! Below is an example, and see here for the explanation.
print(1.0+2.0 == 3.0)
print(0.1+0.2 == 0.3) # WHAT?!
str. There are built-in functions that work on strings directly
a='some string' # a = "some string" is the same.

# some functions work on strings directly
print(len(a))

# string types also have many functions as methods
print(a.upper())
#YOU: type a.<tab> in your notebook, and jupyter will open a list of possible functions!
Built in data structures
Python has list, tuple, dict, and set. Beginners typically rely on lists extensively, but as you progress, you will find that all four are extremely useful, because their unique traits solve different needs.
After class, you should absolutely read this and as you do, try the examples, and throw them into your growing personal cheat sheet.
First, let me illustrate the use of .extend() vs .append() vs + for strings:
L=[8, 5, 6, 3, 7]
L.extend([5])    # extend concatenates
L.extend([3,4])  # concatenates work the same with more elemens
L = L + [13,14]  # + concatenates
L.append(7)      # append adds its entire argument to the list as a new element.
L.append([6])    # 7 is an int, so it goes in as an int, but [6] is a *list*, so append puts a list as the element
L.append([8,9])  # see, the last element is [8,9]
L
Now, let's all define this vector: L=[8, 5, 6, 3, 7].
TRY, PAIR, SHARE: Write code that does the following. Discuss with the person next to you as needed:
- Returns the length.
- Returns the largest element.
- Returns the smallest element.
- Returns the total of the vector.
- Returns the first element. See this awesome answer to learn about "slicing" lists in Python. If that link is dead: https://stackoverflow.com/questions/509211/understanding-slice-notation?rq=1
- Returns the last element.
- Returns the first 2 elements.
- Returns the last 2 elements.
- Returns the odd numbered elements (i.e. [8,6,7].
I'd suggest putting what you just learned about how python indexes an object and how to slice a list into your personal cheat sheet until you have it memorized thoroughly.
For loops
Python loops are very intuitive:
for state in states:
    capitol=stateCapitals[state]
    print(capitol)
    print(capitol.upper())
    <you can use as many lines as you need, just keep indenting>
    <the indents are 4 spaces, or more commonly, a <tab>>

print(states) # <-- the for loop ends when you write a line of
              # code (not a comment!) that is unindented
So, for each state, Python will start the indented block of code and run each line within the code block in sequence. So if the list of states is [Alabama, Alaska, Arizona,...], Python will...
- Set state = 'Alabama'
- Set capitol = 'Montgomery'
- Print 'Montgomery'
- Print 'MONTGOMERY'
- Execute the next two lines of code that I've "skipped above".
- At the end of the block of code, python will check if there is another element in the states vector. There is!
- Set state = 'Alaska'
- Set capitol = 'Juneau'
- Print 'Juneau'
- Print 'JUNEAU'
- ...
- Set state = 'Wyoming'
- Set capitol = 'Cheyenne'
- Print 'Cheyenne'
- Print 'CHEYENNE'
- Is there another state? No? Ok! The for-loop is complete! Python will exit the code block and proceed. The next line of code is
print(states)and so that's the next thing it will do.
A few comments:
PYTHON AND INDENTATION
In python, indentations at the beginning of lines are not "up to the user". Indentations indicate a "block" of code that is run as a unit.
These two codes look similar but produce different results:
x = 7
if x < 5:       # this is false, obviously,
    z = x+2        # so this never runs and
    print('I am not here.') # this doesn't print
print('stating new block')
if x < 5:       # this is false, obviously,
    z = x+2        # so this never runs and
print('I am here') # this does print
- The syntax is
for <name> in <iterable object>:. You must include the colon! After that, all lines of code within the "block" of code of the for loop are indented. See the popout to the right on indentation.- Note: When I write anything inside
<>, you should drop the "<" and ">" symbols too.
- Note: When I write anything inside
- The iterator object can be anything Python can iterate through, e.g. a list. (But not just lists!) So the list above is a list of states, and note that it is descriptively named "states".
- You decide what the
<name>is, and it should be something that communicates the content.- Generally speaking, don't name variables in Python
x,y,z,vector,myvectorand other uninformative names! Use informative names to make you code readable! - If you are looping over
letters, each object might be called aletter, if you are looping overstocks, each element should probably be called astock,.. (DUH, right?)
- Generally speaking, don't name variables in Python
Conversely, how you use whitespace within a line is up to you. Both of these lines of code are the same:
print(      a)

print(a)
If, elif, else
Syntax:
if <condition #1>:                         # you must use the colon!
     <do some stuff if condition is true>
elif <condition #2>:                       # as in "Else-If"
    <if condition #1 is false, and
    condition #2 is true, run this block>
else:
    <if neither #1 or #2 are true, do this>
Comments:
- You can include zero or as many
elifcode blocks as you want - You can omit the
elseblock entirely - Whatever is in
<condition>must evaluate to True or False or 1 or 0 - See the "Logic and comparisons" section above on how Python evaluates conditions
counter = 0
while counter < 7:
    print(counter)
    counter += 1 # "+=" is short for "add to myself".
                 # Here, it's an abbreviation for: counter = counter + 1
I have one important comment about while loops: Every time through the loop, there must be a chance for the condition to become False. If not, your code will loop forever!
Writing your own functions
Writing your own functions is important for improving the clarity of your code because it
- separates different strands of logic
- allows you to reuse code
- prevents copy/paste errors
To write a function, write def <nameOfYourChoice>(<you can specify arguments the function takes, or none>): and then write your indented code block that is the function.
On inputs:
- Any object(s) you want can be given as inputs! You can give as inputs a variable, a list, a dictionary, even a function. Remember, in python, everything is an object.
- Functions can get "positional" arguments or keyword arguments. Positional arguments are understood because Python figures them out based on the order in which you provide them.
On outputs:
- Any object(s) you want can be returned as outputs! Once the code executes a line starting with
return, the function will end and output whatever is on that line. It can be a list, set, function, dictionary, string. It can be a dictionary with lists inside it, or a list with dictionaries inside it. Go wild if you want! (While practicing python. In practice, don't be complex for the sake of it!)
On documentation:
- Code that is poorly documented won't be used. By you, by you in the future, or by others. So you should document it! You do this by adding line(s) immediately after the first line, as the example below shows.
- The docstring can be accessed by users via
<functionName>?orhelp(<FunctionName>)the same as any other function. In fact, this is how help is written in all Python functions we've used!
Example: The function below shows off positional and keyword arguments, how to write a multiline "docstring", how the program ends once a return is executed, outputting a list, and setting default values for inputs.
def f(x, a=1, b=1):
    '''
    The first argument you give goes to x, the second to a, the third to b.
    If you do no provide a or b, they default to the value 1.
    '''
    if x < 0:
        return "WHOA THIS IS NEGATIVE"
    return [a + b * x, 2] # you can return any object(s) you want! this is a list, for example

print(f(-100)) #notice it never gets to a+b*x
print(f(2,2,2))
print(f(1))
print(f(1,b=3))
help(f)
# this won't work! python requires you to use the keyword arguments AFTER the positional arguments
print(f(b=3,1))
x=1
def silly_func():
    xyz = 14
    print(x) # variables defined OUTSIDE AND BEFORE a function are visible INSIDE the func

silly_func()
print(xyz) # variables defined INSIDE a function are NOT visible OUTSIDE the func
x = 1
def silly_func():
    x=2
    return x
print(silly_func())
print(x)               # changing the downstream variable inside the function didn't change the upstream version
Popular, nay, essential packages
As the semester proceeds, you will surely need to learn (to some degree) the following packages. For each, you might note the most common and useful functions, and copy "cookbook" uses of the packages which you can paste into new programs. (E.g. how to open a csv file.)
Note: I do not personally, nor do many programmers, commit to memory many functions of many packages. We simply know what can be done and when needed, we search (tab completion/google/stack overflow) for the command/recipe for that function.
- Built-in packages:
ossysitertoolsredatetimecsv - Datasci packages (Anaconda installs these for you!), note the aliases here aren't strictly needed, but by convention, virtually everyone uses the shorter names
pandas as pdseaborn as snsmatplotlib as mplstatsmodels.api as smmatplotlib.pyplot as pltnumpy as npsklearn
- Web crawling
requests,requests_html,urllibtimeandtdqmbeautifulsoup4 as bs4html5libselenium
Debugging
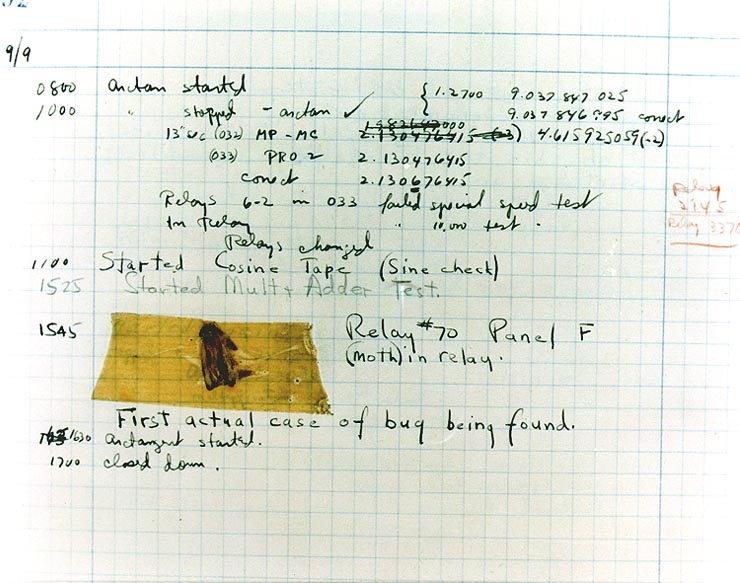
Perhaps the most famous early case of a computer bug was reported by Grace Hopper, who was absolutely a computer science legend and pioneer, and certainly also a bad mama jama. You should definitely go down the wiki rabbit hole on Grace's life sometime.
Computers are extremely powerful but incredibly stupid. We want to both
- Fix bugs when they happen
- Prevent them from happening!
This section is mostly about the former. Good coding habits and defensive coding will help prevent them, and I cover those in the next lecture.
So, to fix bugs, you need to
- Realize that you have a bug
- Figure out where it is
- Make it repeatable (and you'll understand the bug)
- Fix it (duh) and test it (the existence of the bug should disabuse you of your coding invincibility!)
Advice that could save (or cost) you thousands: Those steps are general, and work for other things besides code, like plumbing and electrical work on your parent's house.
Read the error codes!
Really, they tend to be informative! You can google them for more info, but even without Google, they often point directly at the issue and location.
%debug
Flipping switches / divide and conquer / or: find the bug
After slaving over your computer and a piece of paper (you smartly planned out your code before you went in head first), you've found a clever solution to your problem. Your code is beautiful and elegant, like this:
2+2 # imagine this is a bunch of code
2+2 # imagine this is a bunch of code
2+2 # imagine this is a bunch of code
Error # somewhere in the code is an error. But in real programming you don’t know the error is here!
2+2 # imagine this is a bunch of code
2+2 # imagine this is a bunch of code
But python had other ideas, I guess...

Despite the appearance (his computer is on fire, after all), that guy works in IT. He spends all day taking calls from people with computer problems, typically menial. It drives him and his coworker crazy. One of the true lessons of the show, a profound piece of wisdom, really, and one that is my first method of solving virtually any technical issue, comes from that coworker:

I don't mean turning the computer off and on again. (Well, sometimes.) ... But you can turn parts of your code off:
2+2 # imagine this is a bunch of code
2+2 # imagine this is a bunch of code
# 2+2 # imagine this is a bunch of code
# Error # somewhere in the code is an error. But in real programming you don’t know the error is here!
# 2+2 # imagine this is a bunch of code
# 2+2 # imagine this is a bunch of code
At least we know the issue isn't in the first two lines. We can proceed and look elsewhere.
Luckily, python error statements tend to be informative enough. Above, we know the issue is in line 4. But in more sophisticated settings, where the lines above aren't 2+2 but chunks of code, and the error isn't simply due to syntax or namespace issues... the on/off method can be useful. Why? Because many "errors" can exist even when the code executes.
Print statements
Another ugly, possibly brutish method of debugging is: put print statements all over your code.
def silly_func_here_but_in_a_real_situation_its_complicated_and_mysterious_ooooooh():
    return 6
a=silly_func_here_but_in_a_real_situation_its_complicated_and_mysterious_ooooooh()
print(a)
a+=a # += means "add whatever is on the right to the existing value"
print(a) # see, the value changed
b = 'hey'
print (a)
print (b)
a+'hey'
Suppose you have a large dataset you want to explore. What can you do to look at it?
- Print parts of it in Jupyter, along with many summary stats.
- Output to a csv file and open in Excel.
- Use the
spyderprogram that came with Anaconda. Spyder has a UI that is more like Matlab or Stata, and so you can view and scroll through objects in memory a la Excel as you build your code. This can be very, very useful for developing code. (In fact, Spyder is how most of my own research code is written.) Spyder does not however, allow for Markdown.
If you have a dataset in Jupyter you want to open in Spyder, you can either save the object from Jupyter (via the pickle module) and open it in Spyder, or convert the ipynb file to a simple py file which removes the Markdown so that Spyder can run. (File > Download as > py) Then you'd simply execute the code in Spyder up to the point you were at, and continue.
Much of this class will require delivery of ipynb files, and I would recommended using Jupyter exclusively at the beginning. However, if you personally prefer Spyder for bigger projects later on, feel free to use Spyder until the project is ready for write up (at which point you copy the code into a ipynb file and add Markdown elements to build the report).
This isn't even a "debugging" point per se.
You know a 6 is a 6. But we will be handling increasingly large datasets, and it's easy to make rather large changes without knowing exactly what you have done, ... or not done ... , if you don't see into the object. Are you sure that object is exactly what you think it is, containing exactly what you think it does? Thus, the print statement and other ways of "glancing into" datasets are crucial. Even when you've all become pythonic pros, you should tend towards examining your objects "too much".
Are you still stuck?
It'll happen! We will try to build some ambitious code this semester! (Imagine trying to replicate the "simple program" we saw last class in Excel!) Coding complicated analysis is iterative and debugging can be as tough as having your IT firm audited.
So if you've tried the above, what can you do?
- Writing smart code will save us from getting into intractable problems. More on that next class.
- Again, see the resources tab of our website! It's got some good pointers, along with a 15 minute rule: Once you’ve spent 15 minutes attempting to troubleshoot a problem, you must ask for help!
- Finally, the resources tab also suggests that clearing your head and getting a mental break might be a good idea.
Authoring - Spell check and Markdown formatting
The whole point of data analysis is to communicate. You know the saying, if a "Naive Bayes Classification" falls in a forest and no one is around to hear it...
In this class, the Jupyter notebook files are the output we're aiming for. No need to try to reformat for printing, no Word, no LaTeX. Just these notebooks. They weave data and narrative text into reproducible output. That's the goal! The main issue is that there is a lack of built-in spell checks or grammar checks. See the popout to the right for my current spell checker solution. If you find a better option, please let me know!
Adding a spell checker. Open Terminal/Powershell, and run these 3 lines:
pip install jupyter_contrib_nbextensions
jupyter contrib nbextension install --user
jupyter nbextension enable spellchecker/main
How do you write nice reports in Markdown? Well, we already have practice with cells. For help with formatting text, tables, and other possibilities,
- Do this quick tutorial. People have seemed to like this.
- GitHub has a Markdown cheatsheet.
- As usual, I'm often just googling "markdown how to
".
Before next class
- After class: Upload the notebook you've been playing with today into your participation repo.
- Edit your
navigating_github.mdfile from the first class. These changes are a part of your participation grade:- Use 3 markdown features to make the file easier to read for visitors to your repo.
- Add at least one "How to" notes for your own benefit. E.g. "To open my participation repo in Jupyter I run"
jupyter notebook --notebook-dir "C:\Users\Don\FirstPythonCode". You might add similar notes for folders containing your assignments, your peer reviews, your project... You might also note what exactly your workflow is when using GitHub Desktop with a given repo.
- Go through #3 to #14 of A Whirlwind Tour of Python. You'll notice its a deeper dive on much of what we covered today, along with a few new topics. As you go through that, have one large python notebook open, and simultaneously write and execute code as the book discusses it.
- Start the first assignment. It's available.
Credits
To Whirlwind Tour of Python and MACS 30500.