7.5. Model evaluation via cross validation (CV)
We want to develop a model that performs well in the real world. To do that,
Create a holdout sample.
“Train” many models on a portion of the training sample, and use each to predict \(y\) on the remaining/unused part of the training sample.
Repeat step 2 \(k\) times, to see how consistently accurate each model is.
Pick your preferred model.
One time only: Apply your preferred model to the holdout sample to see if it performs as well.
7.5.1. Holdout sample
So we need a way to estimate the test error. The way we do that is by creating a holdout sample (step #2 in the machine learning workflow) to test the model at step #6 after our model development process is completed.
YOU CAN ONLY USE THE HOLDOUT SAMPLE ONCE!
If you use the holdout during the iterative training/evaluation process (steps 3-5), it stops being a holdout sample and effectively becomes part of the training set.
After we create the holdout sample in step #2, we enter the grey box where all the ML magic happens, and pre-process the data (step #3).
7.5.2. Training sample
So, we are at step #3. We have the holdout sample isolated and will develop our model on the training sample.
If we fit the model on the training sample and then examine its performance against the same sample, the error will be misleadingly low. (Duh! We fit the model on it!)
A ha!
It would be nice to have an extra test set, wouldn’t it?!
Great idea: So, at step #3, we split our training sample again, into a smaller training sample and a validation sample.
We estimate and fit our model on the training sample
We make predictions in the validation sample using our fitted model and measure the “accuracy” of the prediction.
7.5.3. Train-validate-holdout: How big should they be?
Depends. Commonly, it’s 70%-15%-15%.
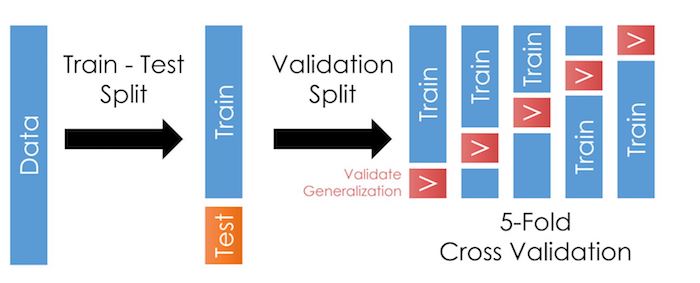
7.5.4. K-Fold Cross-Validation
Problem: 70% and 15% might not be enough to train and evaluate your candidate models. What if your 15% validation sample just randomly happens to work very well with your model in a way that doesn’t replicate beyond it?
A ha!
It would be nice to have more validation samples, wouldn’t it?!
Great idea: K-Fold Cross-Validation.
K-Fold Cross-Validation: Take the training data (85% of the original sample) and split it up into a training and validation sample, fit the model on the smaller training sample, and test it on the validation sample. Then repeat this by dividing the data into a different training/validation split. And repeat this \(k\) times to get \(k\) validation samples.
Here, it looks like this:
Tip
When you’ve estimated your model on each of the 5 folds, and applied your predictions to the corresponding validation sample, you will get some “accuracy score” (which might be R2 or something else listed here) for that model for each of the 5 folds.
So if you run \(N\) models, you’ll end up with a dataset like this:
Model |
Fold 1 score |
Fold 2 score |
… |
Fold \(k\) score |
|---|---|---|---|---|
1 |
.6 |
.63 |
… |
.57 |
2 |
.8 |
.4 |
… |
..6 |
… |
||||
N |
.5 |
.1 |
… |
.2 |
Store that info, as it will help you decide which model to pick!
7.5.5. A note about K-Fold cross validation
Warning
The exact method of splitting the sample above (split the data up into 5 random chunks) doesn’t work well in many finance settings. The next page will explain!
7.5.6. Summary of CV
Separate out part of the dataset as a “holdout” or “test” set. The rest of the data is the “training set”.
Start steps #3-#5 of the flowchart.
Split the “training set” up into a smaller “training” set and a “validation set”.
Estimate the model on the smaller training set. The error of the model on this is the “training error”.
Apply the model to the validation set to calculate the “validation error”.
Repeat these “training-validation” steps \(k\) times to get the average validation error.
Repeat these steps on each candidate model you are considering.
The model that has the lowest average validation error is your model.
Test the model against the holdout test sample and compute your final “test error”. You are done, and forbidden from tweaking the model now.